Assignments > JavaScript Loops with Data
Due Thu, 11/13 at 11:59pm
Practice looping over arrays and objects, applying conditionals, and preparing data for later visualization. Complete each exercise locally in your browser (open the index.html files) and use the console (Cmd+Opt+J in Chrome) to verify your work. Each exercise has a main.js with TODOs.
Setup
Please download the lab06.zip file, unzip it, and move it into yoru mser521 folder. Then, complete the 7 exercises below:
Exercise 1: Array Basics
Folder: /downloads/labs/lab06/01-array-basics/
Practice basic array access and iteration using for loops and for...of loops.
Data Structures:
const numbers = [3, 8, 12, 5, 19, 21, 4, 10, 7, 16];
const fruits = [
    'apple', 'banana', 'cherry', 'date', 'grape',
    'kiwi', 'lemon', 'mango', 'orange'
];
Tasks:
- Print the first item in the
fruitsarray to the console - Print the second item in the
fruitsarray to the console - Print the third item in the
fruitsarray to the console - Print the last item in the
fruitsarray to the console (uselengthto find the last index) - Using a
for...ofloop, print each item in thefruitsarray to the console
Exercise 2: Array DOM Exercise
Folder: /downloads/labs/lab06/02-array-dom-exercise/
Practice iterating over an array and dynamically creating HTML elements in the DOM. This exercise combines array iteration with DOM manipulation to build an image gallery.
Data Structure:
An array of image file paths is provided:
const imagePathList = [
  'images/poppies.jpg',
  'images/dogwoods.jpg',
  'images/blossom.jpg',
  'images/field3.jpg',
  'images/field4.jpg',
  'images/branch.jpg',
  'images/red.jpg',
  'images/purple2.jpg',
  'images/field1.jpg',
  'images/purple.jpg',
  'images/jar.jpg',
  'images/green.jpg',
  'images/green1.jpg',
  'images/purple1.jpg',
  'images/magnolias.jpg',
  'images/daisy1.jpg',
];
Tasks:
- Select the container element with class
cardsusingdocument.querySelector() - Loop through the
imagePathListarray using afor...ofloop - For each image path, create an
<img>element with:srcattribute set to the image pathaltattribute set to a descriptive text (you can extract the filename or use a generic description)
- Add each image to the container using
innerHTML +=orappendChild()
Note: The HTML file already includes a <div class="cards"> container where the images should be added. The CSS file (gallery.css) is already linked and will style the images in a responsive grid layout.
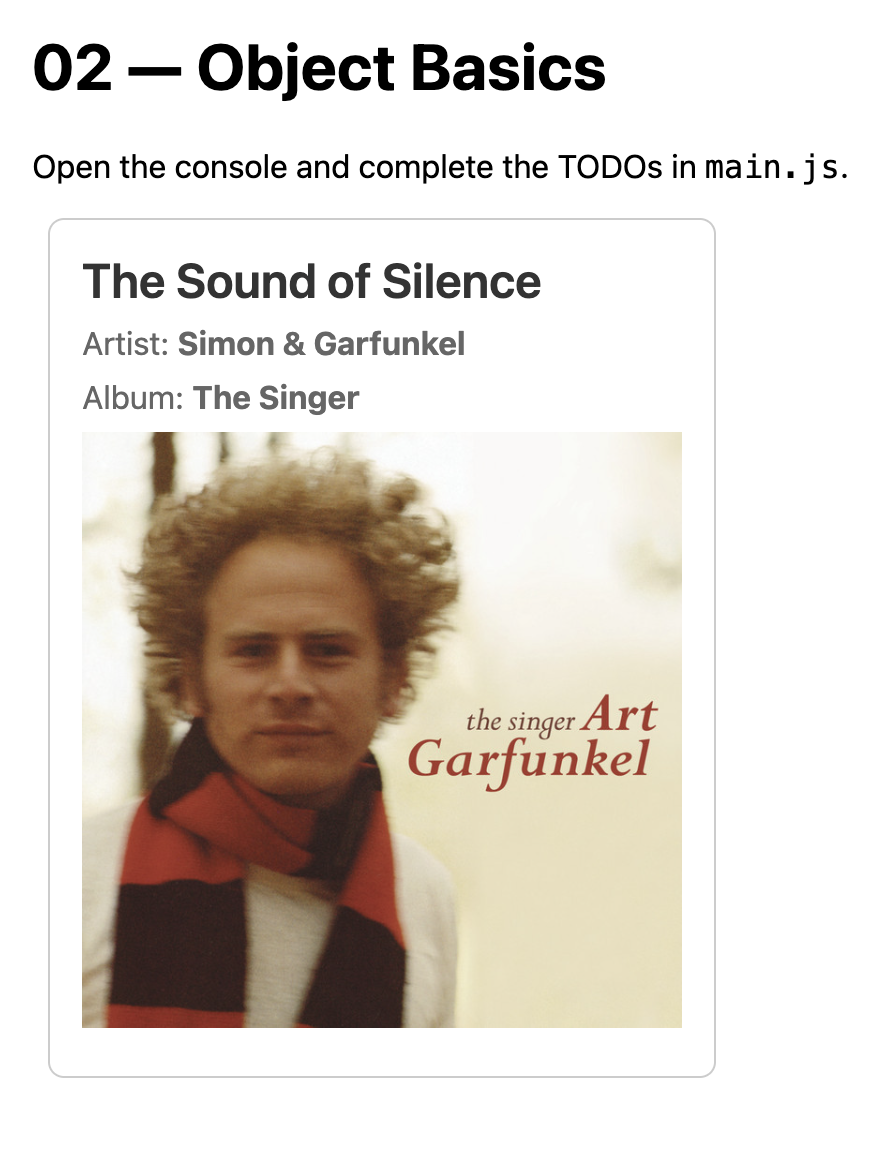
Exercise 3: Object Basics
Folder: /downloads/labs/lab06/03-object-basics/
Practice accessing object properties, including nested objects, and displaying data in the DOM.
Data Structure:
const track = {
  id: '3YfS47QufnLDFA71FUsgCM',
  name: 'The Sound of Silence',
  album: {
    id: '0D1OzpaQEeiIMCAm3DUwKa',
    name: 'The Singer',
    image_url: 'https://i.scdn.co/image/ab67616d0000b273dd9e17a2000252d6b79cf904',
  },
  artist: {
    id: '70cRZdQywnSFp9pnc2WTCE',
    name: 'Simon & Garfunkel',
  },
};
Tasks:
-
Print the
idproperty of thetrackobject to the console -
Print the
nameproperty of thetrackobject to the console -
Print the album name (access the nested
album.nameproperty) to the console -
Print the artist name (access the nested
artist.nameproperty) to the console -
Print the album cover image URL (
album.image_url) to the console -
Create an HTML representation of the track and display it in the DOM element with
id="container". Use template literals to include:- Track name as an
<h2> - Artist name in a
<p>tag - Album name in a
<p>tag - Album cover image using the
<img>tag
- Track name as an
Exercise 4: Array of Objects
Folder: /downloads/labs/lab06/04-array-of-objects/
Practice iterating over an array of objects and accessing properties within each object.
Data Structure:
const fruits = [
  { name: 'apple', color: '#d1495b', emoji: '🍎', count: 12 },
  { name: 'banana', color: '#f1c40f', emoji: '🍌', count: 8 },
  { name: 'cherry', color: '#c0392b', emoji: '🍒', count: 20 },
  { name: 'date', color: '#8e5a33', emoji: '🌴', count: 6 },
  { name: 'grape', color: '#6c5ce7', emoji: '🍇', count: 18 },
  { name: 'kiwi', color: '#27ae60', emoji: '🥝', count: 9 },
  { name: 'lemon', color: '#f9e79f', emoji: '🍋', count: 14 },
  { name: 'mango', color: '#f39c12', emoji: '🥭', count: 7 },
  { name: 'orange', color: '#e67e22', emoji: '🍊', count: 11 },
];
Tasks:
-
Print the name of the first fruit object to the console
-
Print the emoji of the second fruit object to the console
-
Print the count of the third fruit object to the console
-
Print the count of the last fruit object to the console
-
Using a
for...ofloop, print each fruit's color swatch and name to the console -
Using a
for...ofloop, display each fruit's emoji, name, and count in a<div>tag within the element withid="container"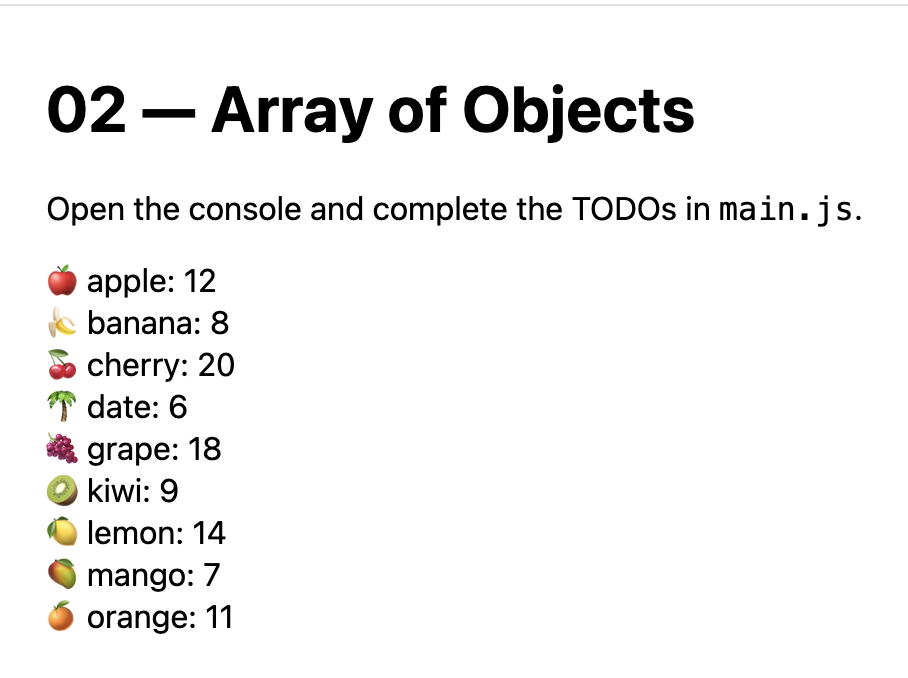
Exercise 5: Live Data
Folder: /downloads/labs/lab06/05-live-data/
Practice fetching data from an API and working with the response. This exercise introduces async/await and the fetch API to retrieve live data from the web.
Data Source:
The data comes from the JSONPlaceholder API, which provides fake user data. The API endpoint is:
const response = await fetch('https://jsonplaceholder.typicode.com/users');
const users = await response.json();
Expected Data Structure:
Each user object in the users array has the following structure:
{
  id: 1,
  name: "Leanne Graham",
  email: "Sincere@april.biz",
  address: {
    street: "Kulas Light",
    city: "Gwenborough",
    zipcode: "92998-3874",
    // ... other properties
  },
  // ... other properties
}
Tasks:
- Print the name of the first user to the console
- Print the email of the last user to the console (use
lengthto find the last index) - Print the city of the user at index 2 (the third user) to the console (access
address.city) - Using a
for...ofloop, print all user names to the console - Using a
for...ofloop, display each user's name and email in a<p>tag within the element withid="container". Format it as:✉️ [name] - [email]
Note: The starter code includes an async function getUsers() that fetches the data. Complete the TODOs inside this function. Make sure to select the container element with document.querySelector('#container') before using it.
Exercise 6: Spotify Data
Folder: /downloads/labs/lab06/06-spotify-data/
Practice fetching data from the Spotify API and displaying it in the DOM. This exercise combines form input, API calls, and dynamic HTML generation.
Data Source:
The data comes from the APITutor Spotify API. The API endpoint format is:
const url = `https://www.apitutor.org/spotify/simple/one/v1/search?q=${searchTerm}&type=track`;
const response = await fetch(url);
const track = await response.json();
Expected Data Structure:
The API returns a single track object with the following structure:
{
  id: "track_id",
  name: "Song Name",
  album: {
    id: "album_id",
    name: "Album Name",
    image_url: "https://i.scdn.co/image/..."
  },
  artist: {
    id: "artist_id",
    name: "Artist Name"
  },
  preview_url: "https://p.scdn.co/mp3-preview/..."
}
Tasks:
- Complete the
showTrack()function to fetch a track from the Spotify API using the search term from the input field - Display the track information in the container element with
id="container"using a template literal - Create a
<section>element with classtrackthat includes:- The track name as an
<h2> - The album cover image using
<img>withsrcset totrack.album.image_urlandaltset to the track name - The artist name in a
<p>tag
- The track name as an
Note: The HTML file already includes a search input and button. The button calls showTrack() when clicked. You need to:
- Get the search term from the input field
- Build the API URL with the search term
- Fetch the data and parse the JSON response
- Create and display the HTML template with the track data
Exercise 7: Spotify Multiple Tracks
Folder: /downloads/labs/lab06/07-spotify-multiple-tracks/
Practice fetching multiple tracks from the Spotify API and displaying them using Spotify embed iframes. This exercise builds on Exercise 6 by working with arrays of track data instead of a single track.
Data Source:
The data comes from the APITutor Spotify API. The API endpoint format is:
const url = `https://www.apitutor.org/spotify/simple/v1/search?q=${searchTerm}&type=track&limit=10`;
const response = await fetch(url);
const tracks = await response.json();
Expected Data Structure:
The API returns an array of track objects (up to 10 tracks).
[{...}, {...}, {...}, {...}, {...}, {...}, {...}, {...}, {...}, {...}]Tasks:
- Complete the
showTracks()function to fetch multiple tracks from the Spotify API using the search term from the input field - Loop through the
tracksarray using afor...ofloop - For each track, create a Spotify embed iframe using the track's
id - Add each iframe to the container element using
innerHTML +=(note: use+=to append, not=which would replace)
Spotify Embed Iframe Format:
Use this template for each track:
<iframe data-testid="embed-iframe" style="border-radius:12px"
  src="https://open.spotify.com/embed/track/${track.id}?utm_source=generator"
  width="100%" height="152"
  frameBorder="0" allowfullscreen=""
  allow="autoplay; clipboard-write; encrypted-media; fullscreen; picture-in-picture"
  loading="lazy"></iframe>
Note: The HTML file already includes a search input and button. The button calls showTracks() when clicked. The key difference from Exercise 6 is:
- The API endpoint uses
/simple/v1/search(not/simple/one/v1/search) and includes&limit=10 - The response is an array of tracks, not a single track object
- You need to loop through the array and create an iframe for each track
- Use
innerHTML +=to append each iframe (notinnerHTML =which would only show the last track)
What to Submit
Please make sure that you have completed all 7 exercises.
When you're done, please create a link from your homepage to the Lab 6 index.html page at the root of your lab06 folder (see Sarah's homepage for an example). Then, commit and push all of your edits to GitHub and, paste a link to your GitHub Repository and to your GitHub pages in the Moodle submission.